
Set the margins of Word document
On this page we explain how to set the margins of a Word document in five practical steps. This way you prepare your document for printing and you are always assured of a safe print margin. Before you start setting up the margins of your Word document...
...this is what you should know about margins:
To prevent an image or text from 'falling off' the page, you must take into account a distance (text margin) of at least 5 millimeters from the border of the page. This applies to both text and images. Pay attention! This applies to both non-borderless and borderless files.
When printing a binded book a part of the page will disapear in the binding spine and you will have to take into account a greater distance (text margin) of at least 15 mm. This only applies to the inside borders of the pages in your document. Moreover, when designing a document for perfect binding finishing, please keep in mind that adhesively binded books cannot lay completely flat. This means that even when you put your design exactely in het middle of the page, there is a chance that after finishing of the book, your design does not appear as centered. This can also be seen in the preview of your document.

Setting up the document margins in Word in five steps
The margins of a Microsoft Word document can be adjusted manually. Follow these steps to set the margins.
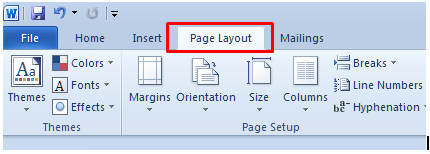
1. If Word is open, click at the tabs (top) for Page setup / Page layout.
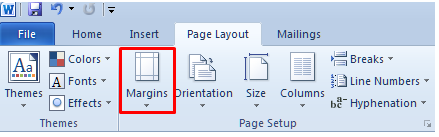
2. Select the Margins / Margins option in this Page Setup tab.
3. If Margins / Margins is clicked, choose more Custom Margins / Custom Margins at the bottom of the list.
4. A Page Settings / Page Setup pop-up window will appear, in which the margins of the page can be adjusted.
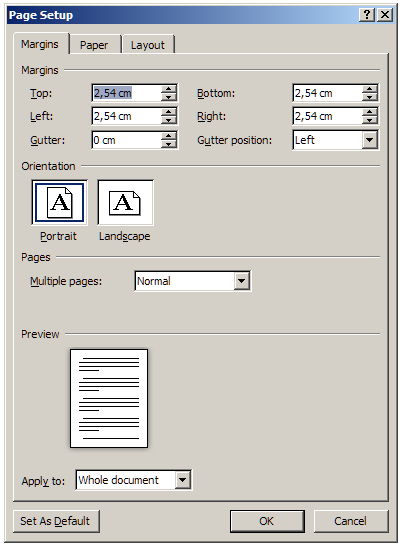
5. When the margins have been adjusted, click OK.